← Installation · Home · Next: Building Pages →
There are two ways Claude can talk to your site. Pick whichever matches how you use Claude:
| Method | Best for | What you copy |
|---|---|---|
| MCP custom connector (recommended) | claude.ai (web), Claude Desktop, Claude Code | The MCP connector URL |
| API key + prompt | Pasting a quick instruction into any chat, or terminal/curl |
The Quick connect line (or the API key) |
The MCP connector is the cleanest experience — Claude gets proper tools (divi_create_page, divi_get_design_system, etc.) instead of having to craft raw HTTP requests.
The Divi 5 Skill — now built in #
Connecting used to take two pieces; the second is now handled for you. The Divi Connect connector gives Claude the tools to build live on your site, and the Divi 5 Skill gives Claude the know-how — how to write valid, on-brand Divi 5 markup. As of the current build the Skill is bundled inside the connector: Claude loads it automatically when it connects and pulls only the parts it needs, so you no longer have to install it separately. It always matches your plugin version and works everywhere — claude.ai (including free accounts), Claude Desktop and Claude Code.
You can still add the standalone Divi 5 Skill from the Divi 5 Skill page if you’d like it loaded in your Claude client too, but it’s optional now. Add the connector below.
Option A — Add the MCP connector to claude.ai (web) #
- In Divi Connect → Connection, click Copy MCP URL.
- Go to claude.ai → Customize → Connectors.
- Click the + in the Connectors panel, then choose Add custom connector.
- Give it a name — Divi Connect does nicely — then paste your MCP connector URL. Leave the OAuth fields blank — the key is already in the URL.
- Save. Claude will connect and the connector will appear with your site’s name, e.g. “Divi Connect – My Site (mysite.com)”.
The same six steps, in pictures #
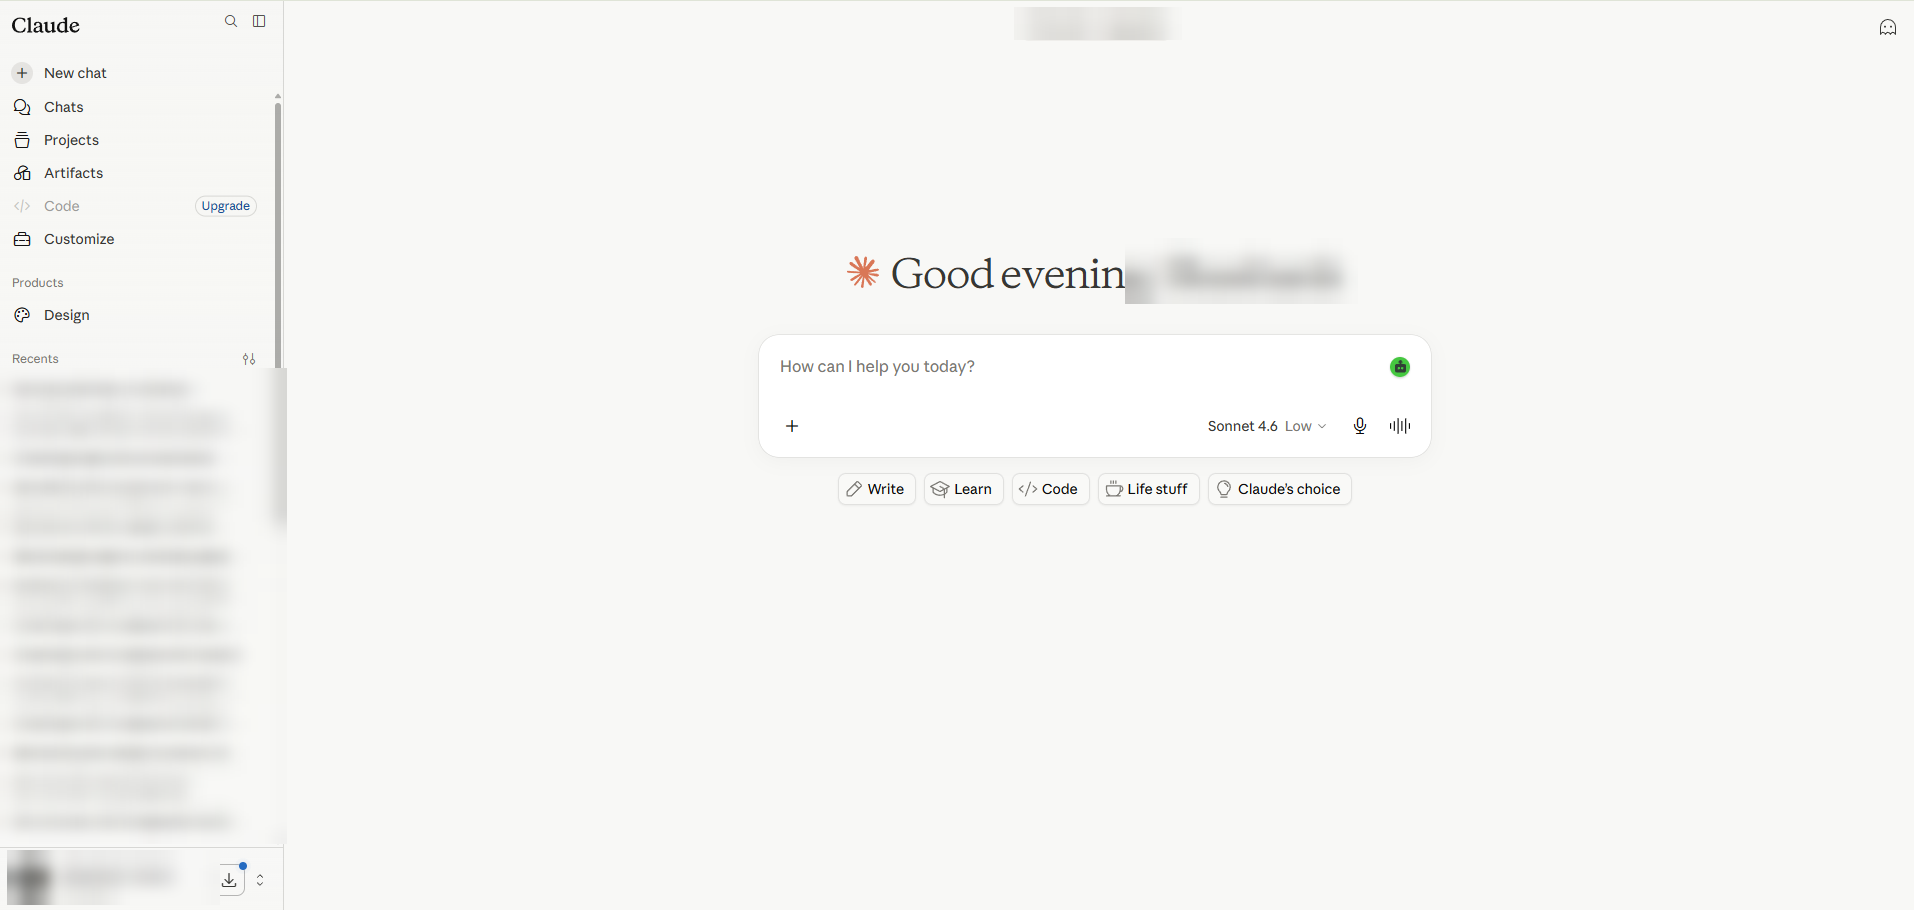
Step 1 — in Claude’s left sidebar, open Customize. A free Claude account works fine.
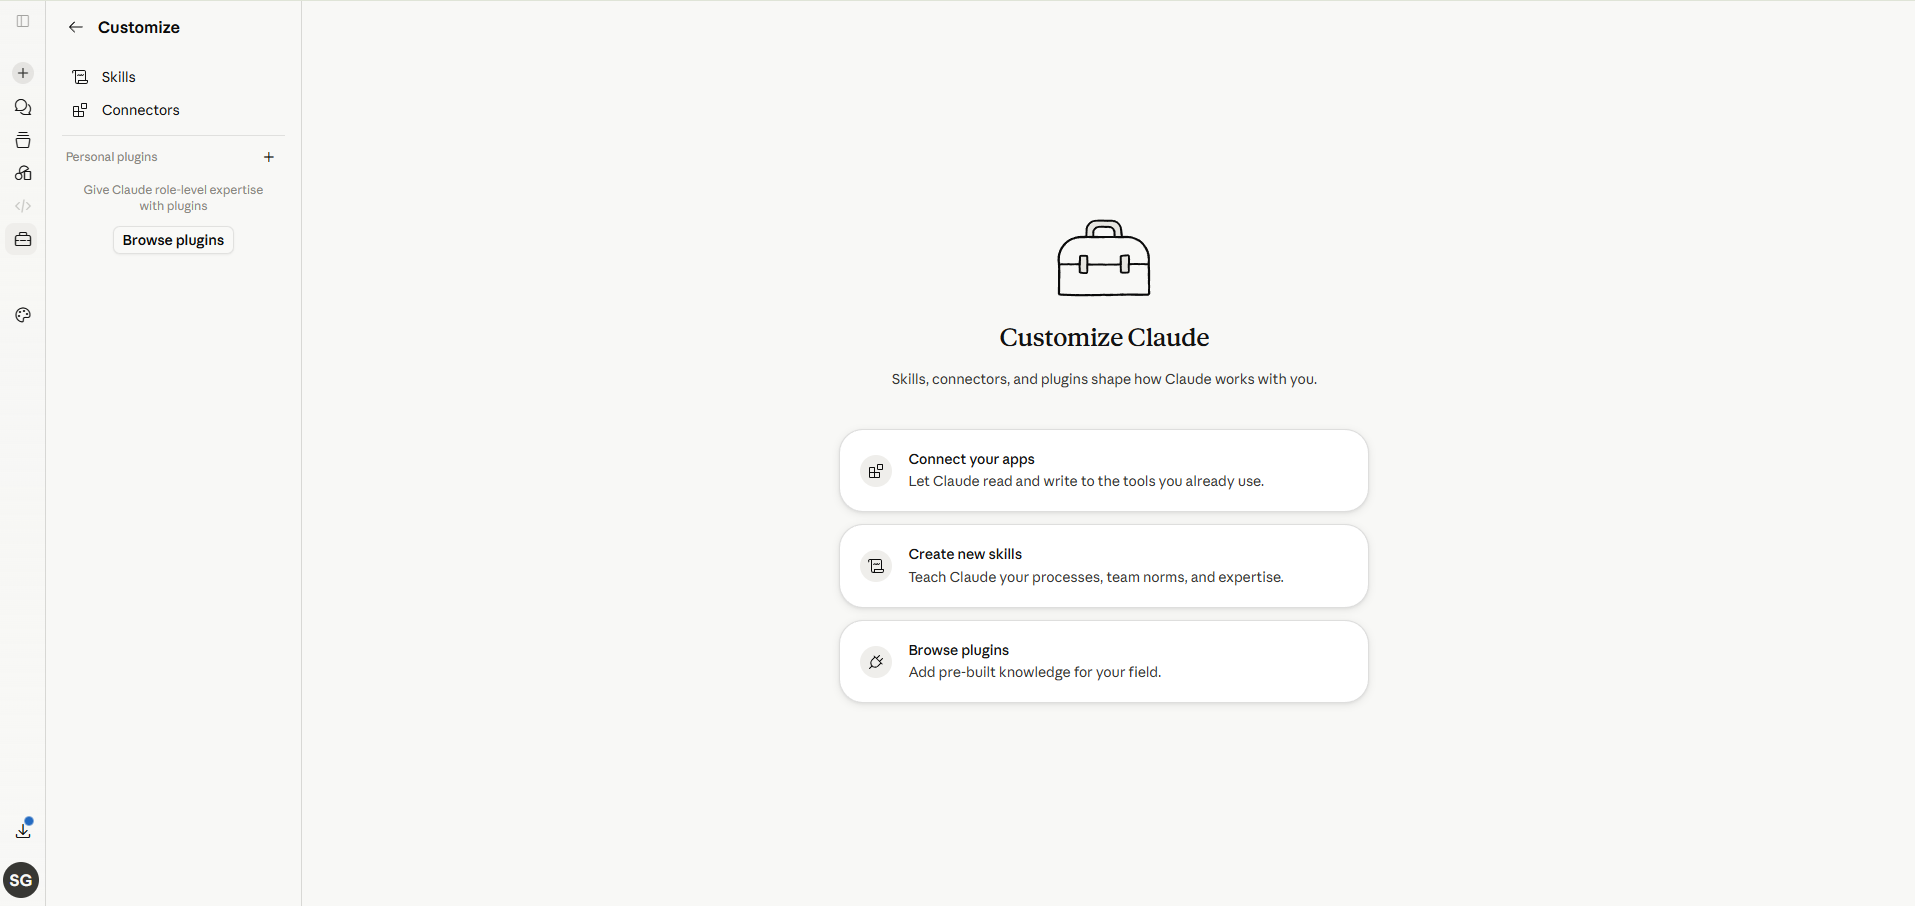
Step 2 — under Customize, select Connectors.
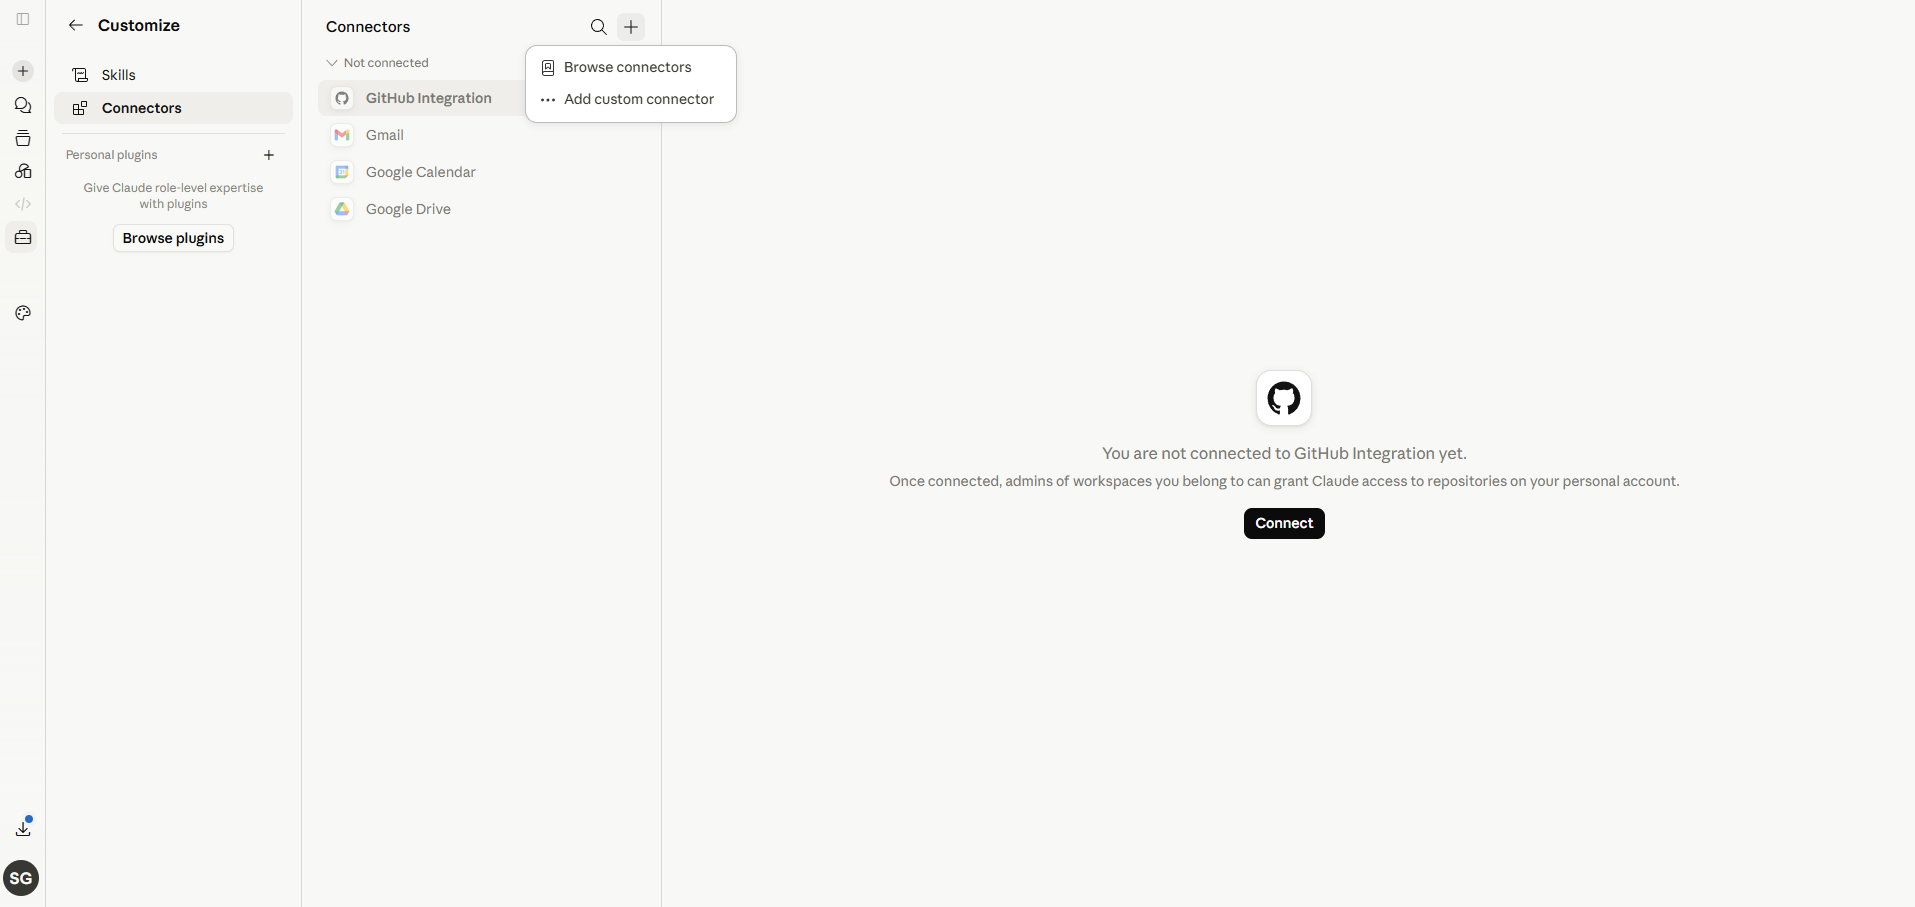
Step 3 — click the + in the Connectors panel, then choose Add custom connector.
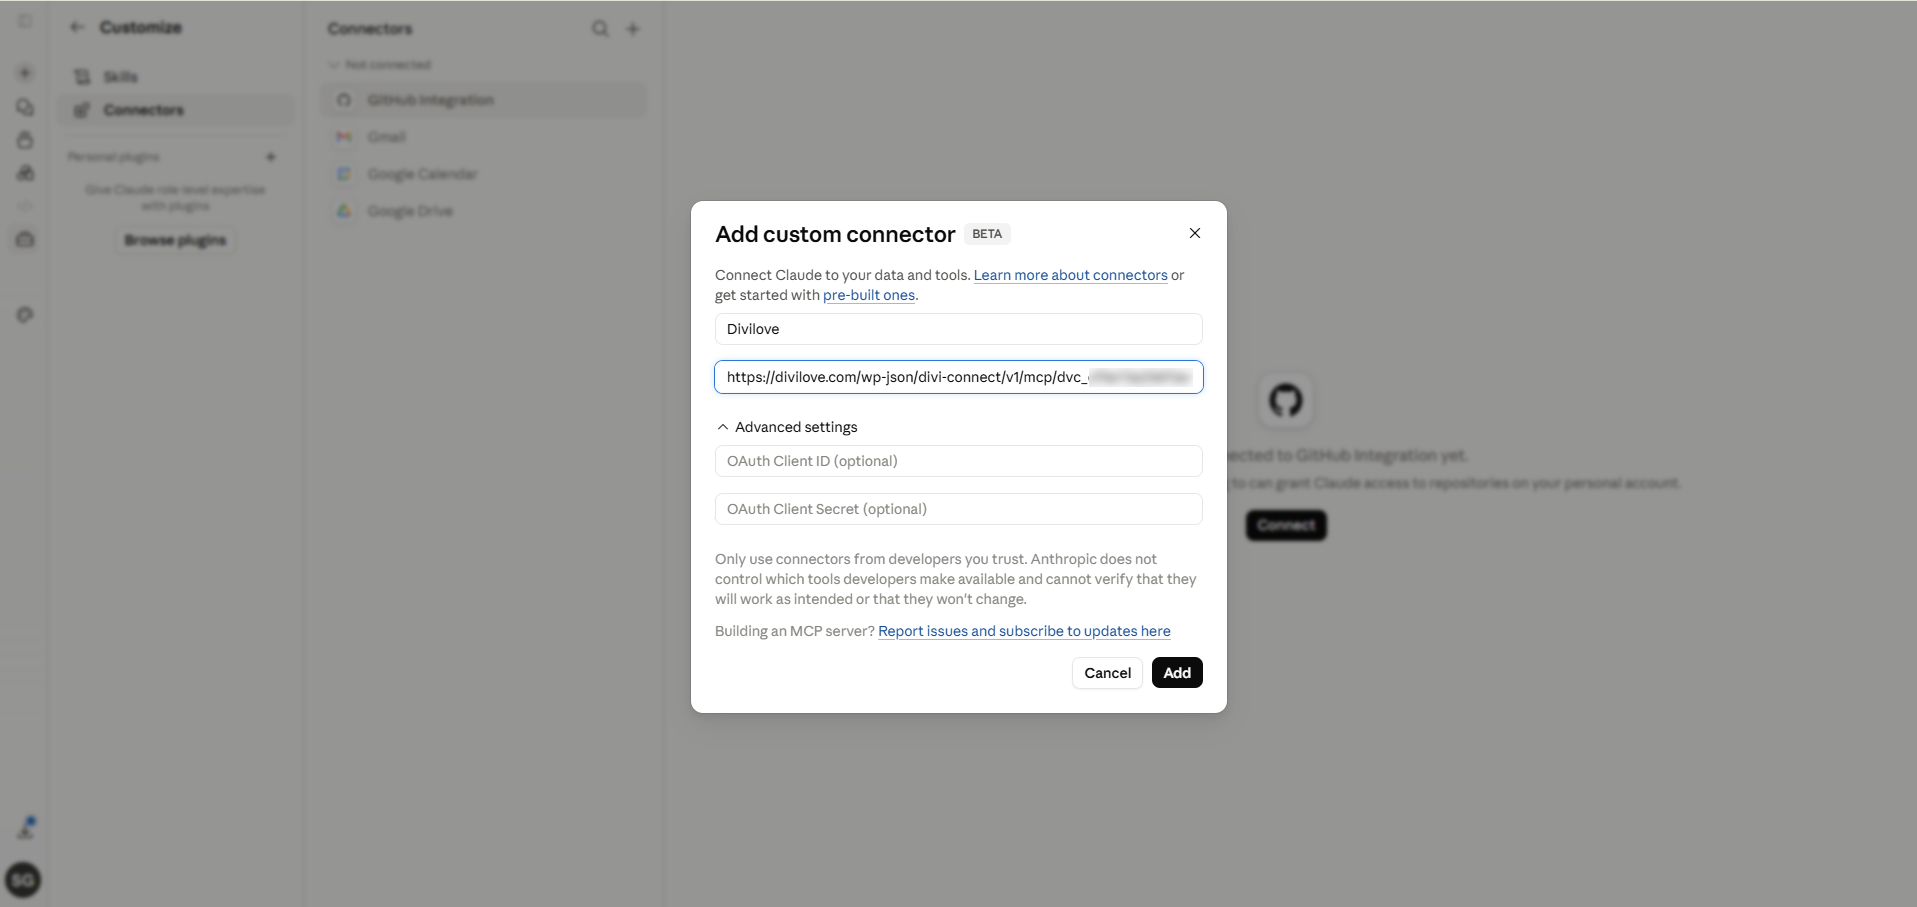
Step 4 — give it a name, paste your Divi Connect connector URL, leave the OAuth fields blank, and click Add.
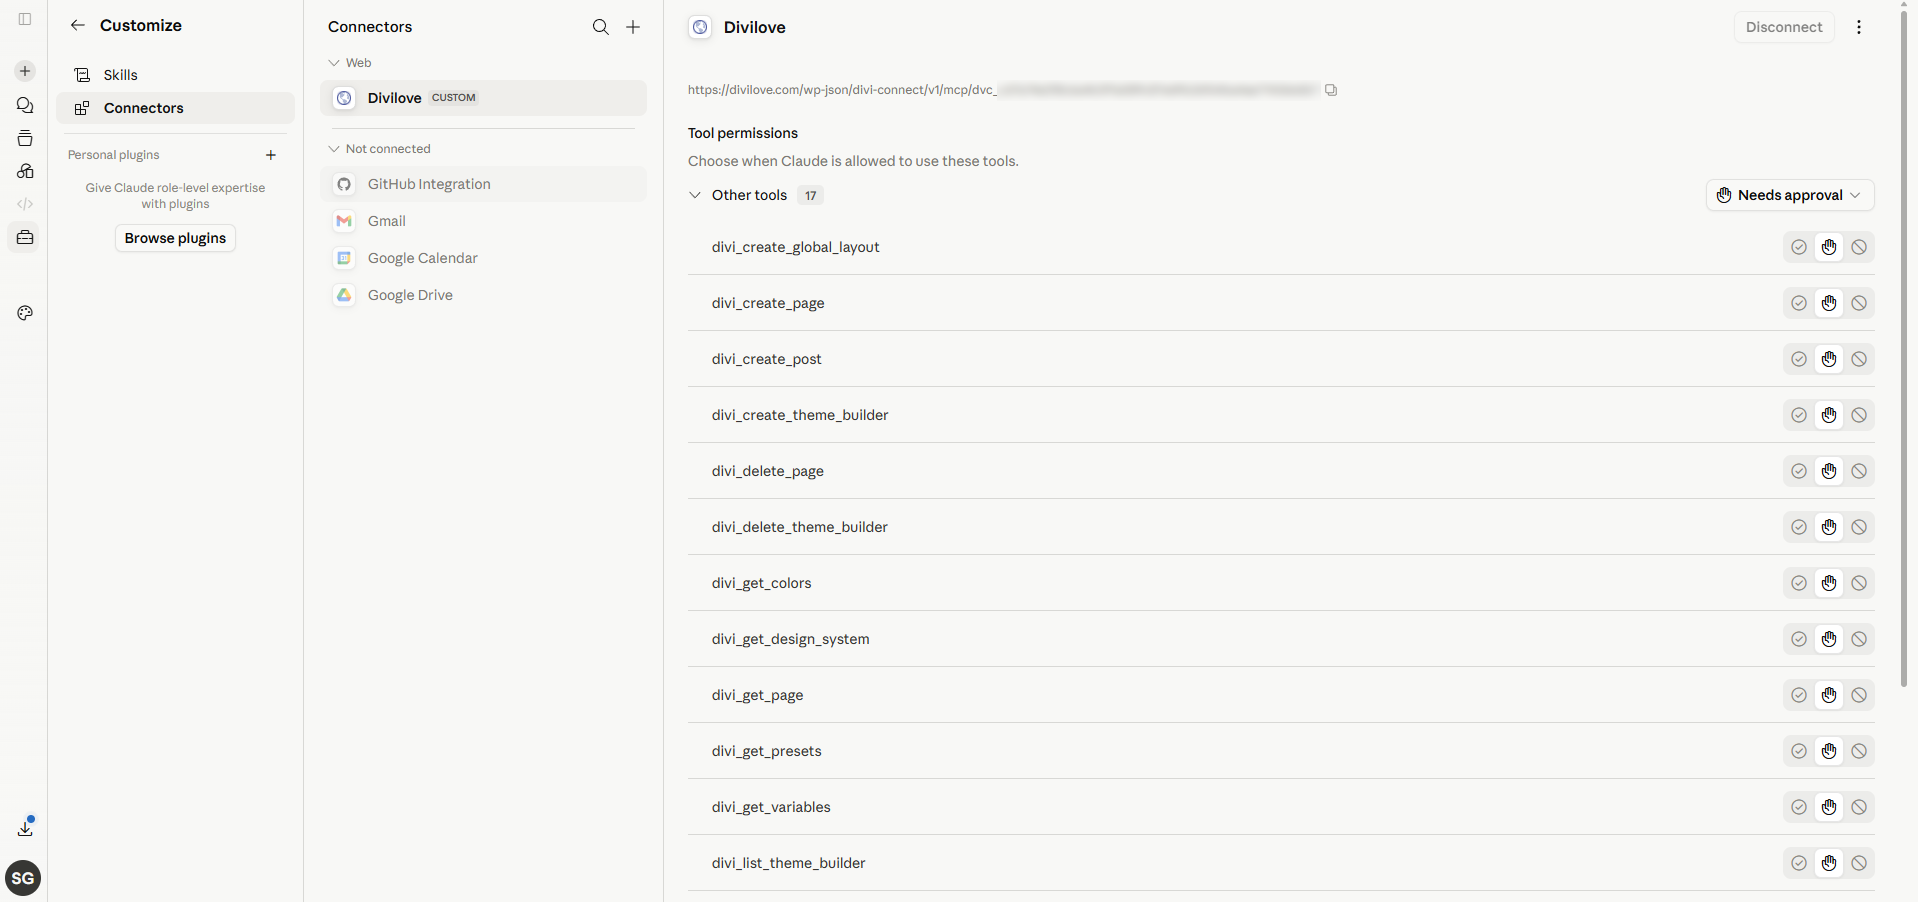
Step 5 — Claude now lists your Divi tools: build pages, manage the Theme Builder, read your design system, and more. (The number of tools grows with each release.)
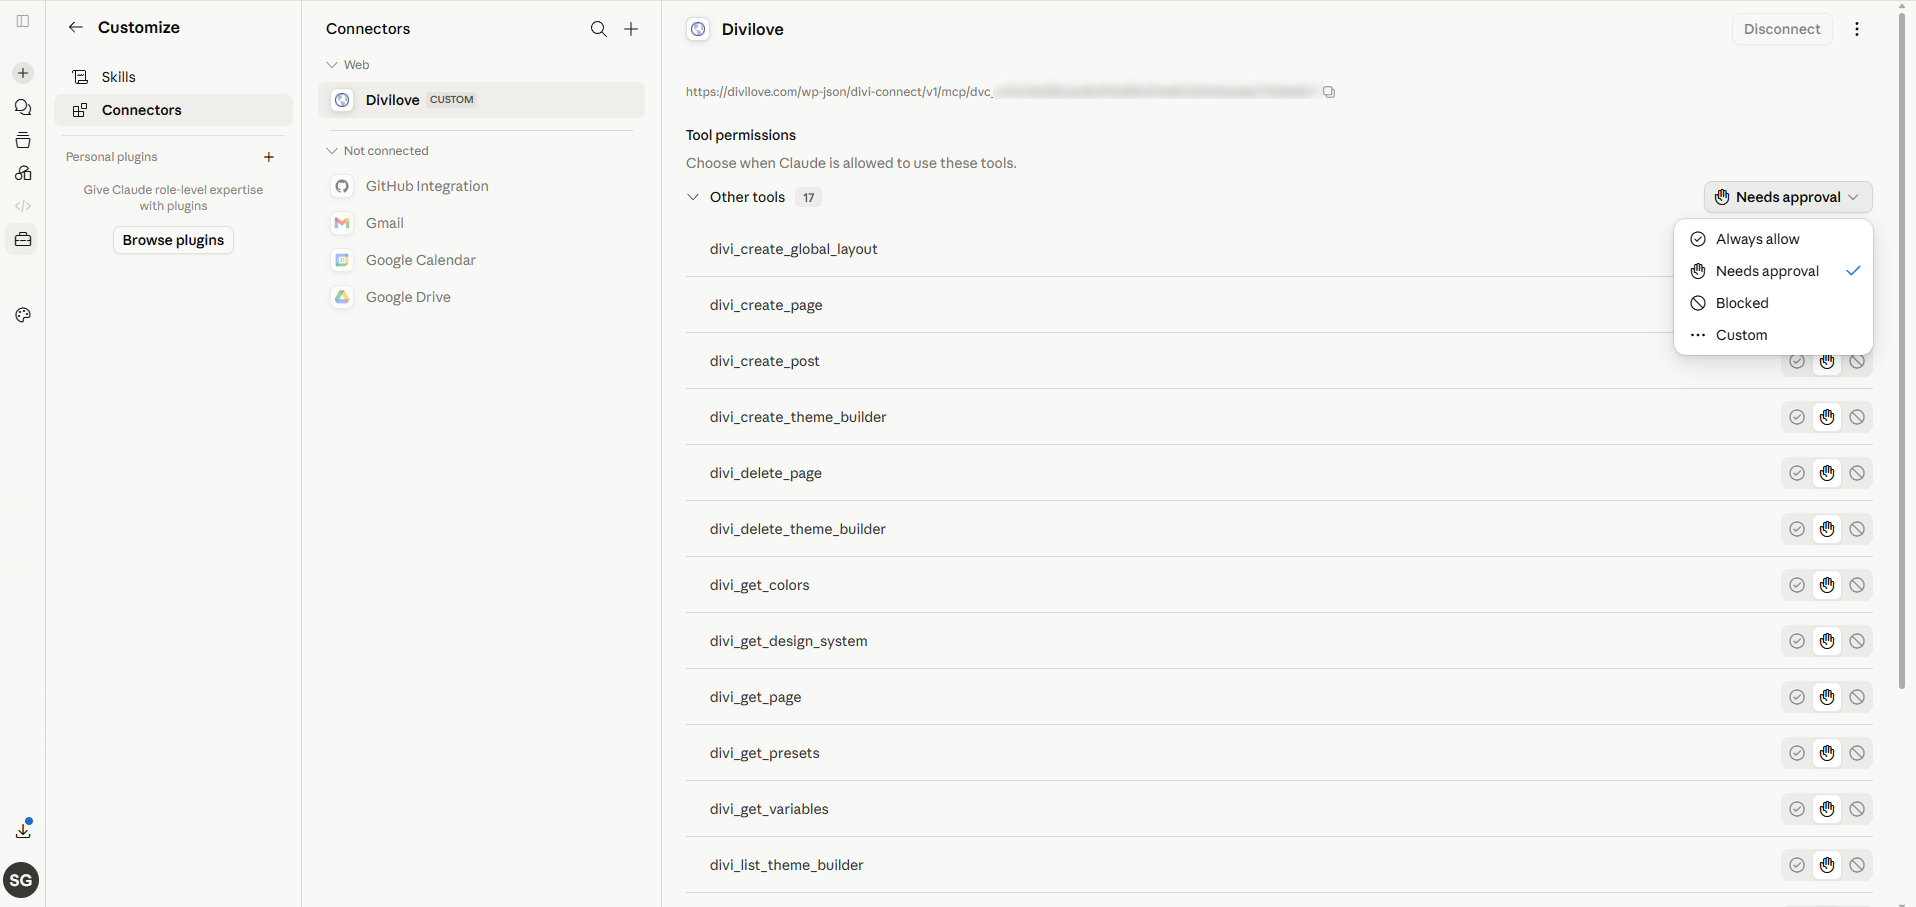
Step 6 — optionally choose how Claude uses each tool: Always allow, Needs approval, or Blocked.
Once added, start a new chat and the Divi Connect tools are available. Try: “What site are you connected to, and what colors does it have?”
Free Claude accounts can add custom connectors and build pages. You don’t need a paid Claude subscription.
Option B — Add the connector to Claude Desktop #
- Copy the MCP connector URL from the settings page.
- In Claude Desktop → Settings → Connectors → Add custom connector, paste the URL (leave OAuth blank).
- Save and start a chat.
The Claude Desktop dialog is identical to the claude.ai one shown in the six figures above — same fields, same blank OAuth boxes.
Option C — Add the connector to Claude Code (terminal) #
Claude Code supports HTTP MCP servers. Add Divi Connect with one command (paste your MCP URL):
claude mcp add --transport http divi-connect "https://yoursite.com/wp-json/divi-connect/v1/mcp/YOUR_KEY"
Then in Claude Code, the divi_* tools are available. Verify with /mcp inside Claude Code, or just ask Claude to read your design system.
Or skip MCP entirely: copy the Quick connect line from the settings page and paste it into any Claude chat. It tells Claude your base URL and key and asks it to make the HTTP calls itself with its web tools or curl:
Connect to my Divi 5 website through the Divi Connect plugin. Base URL: …
send the header "X-Divi-Connect-Key: …" on every request …
After updating to 2.3.0 — reconnect once, and then you are done #
Claude caches the connector’s tool list, and its URL, at the moment you add it. That used to mean re-adding the connector after every update: when a release added tools, Claude kept using the list it had cached, so a new feature looked “missing” or Claude said it could not do something it now could.
From 2.3.0 that stops. The connector presents three tools — divi_discover, divi_describe and divi_execute — and everything Divi Connect can do is reached through them. Nothing is renamed and nothing is removed; what changed is that the list no longer grows when features are added. So you reconnect once after updating to 2.3.0, and later updates need no reconnect at all.
A connector still holding the old list keeps working exactly as it did — you are not broken until you reconnect, you simply do not get the shorter list yet.
You do still need to re-add the connector whenever its URL changes (a regenerated key, a new domain). That part has not changed, and the warning below still applies in full.
⚠️ Delete and re-add — don’t just edit or refresh it #
Editing an existing connector, using its Refresh option, or toggling it off and on does not reliably replace what Claude has cached — and it definitely does not replace the URL. If you change the URL of a connector that already exists, claude.ai keeps sending the old one, whatever you paste into the box. Every symptom then points somewhere else: a key you have already corrected still reads as invalid, and because an invalid key used to be answered in a way Claude reads as “this site wants me to sign in,” you get a sign-in / OAuth error for what is only a stale URL. This is genuinely hard to diagnose from the outside — it has cost days.
So: remove the connector completely, then add it back.
Once after updating to 2.3.0, and always after the key changes:
- claude.ai / Claude Desktop: copy the connector URL fresh from WP Admin → Divi Connect (not from an older email, chat or note — if the key has changed since, that URL is dead). Then open Settings → Connectors, remove Divi Connect, and add it again with the URL you just copied.
- Claude Code:
claude mcp remove divi-connect, then add it again with a freshly-copied URL.
Then start a new chat.
Quick check: after re-adding you should see exactly three tools — divi_discover, divi_describe and divi_execute. That is the whole surface now, and seeing a long list instead means the old one is still cached. Divi Connect also flags this for you: if your connector is out of date, Claude will notice (via the design-system read) and ask you to reconnect rather than assume a capability is unsupported.
One thing worth knowing about the shorter list. Because a single tool now does the work, choosing “Always allow” on
divi_executelets Claude run any Divi Connect operation without asking again. Read-only mode, Protect global design & Theme Builder, and the confirm-before-overwrite check all still stop a change and ask you.
The key changes if you regenerate it, or if you delete and reinstall the plugin (a normal update is safe). Any connector added before that point keeps failing until you re-add it, so treat “I regenerated the key” and “I reinstalled the plugin” as automatic triggers for the steps above.
Connecting a local site #
When the plugin detects a local address, the settings page shows a tunnel hint right under the connector URL:
If your site runs locally (for example in Local by Flywheel, with a .local address), neither claude.ai (cloud) nor the Claude Desktop app can reach it directly — both route their connector requests through Anthropic’s servers, which have no path to your machine. A trusted local HTTPS certificate does not fix this; the issue is reachability, not the certificate. You have two choices:
- Use Claude Code on the same machine — it runs locally and can reach
http://yoursite.localdirectly. Use Option C above. (Note: the Claude Desktop app cannot — its connector is brokered server-side, so it needs a tunnel just like claude.ai.) - Expose the site with a tunnel so claude.ai (cloud) or Claude Desktop can reach it. The settings page detects a local site and shows a hint. For example, with cloudflared:
bash

  cloudflared tunnel --url http://yoursite.local
Local by Flywheel tip: Local routes sites by their hostname, so add
--http-host-headeror you’ll get a “Site Not Found” page through the tunnel:
bash

cloudflared tunnel --url http://yoursite.local --http-host-header yoursite.local
This prints a temporary public https://…trycloudflare.com address. Your connector URL then becomes:
text

  https://<random>.trycloudflare.com/wp-json/divi-connect/v1/mcp/YOUR_KEY
Paste that URL into claude.ai as the custom connector.
The tunnel command prints the public HTTPS address in your terminal as soon as it starts — copy it from there. Leave the command running: the address only works while the tunnel is up, and you’ll get a new one next time.
The settings page shows this tunnel hint automatically when it detects a
.local,.test, orlocalhostaddress.
Did it work? #
In a fresh Claude chat, ask:
“Which site are you connected to, and what’s in its design system?”
Claude should reply with your site name and URL, then list your colors, variables, and presets. That confirms the connector is live. If not, see Troubleshooting.
← Installation · Home · Next: Building Pages →


